Moduflex insPurr Manual
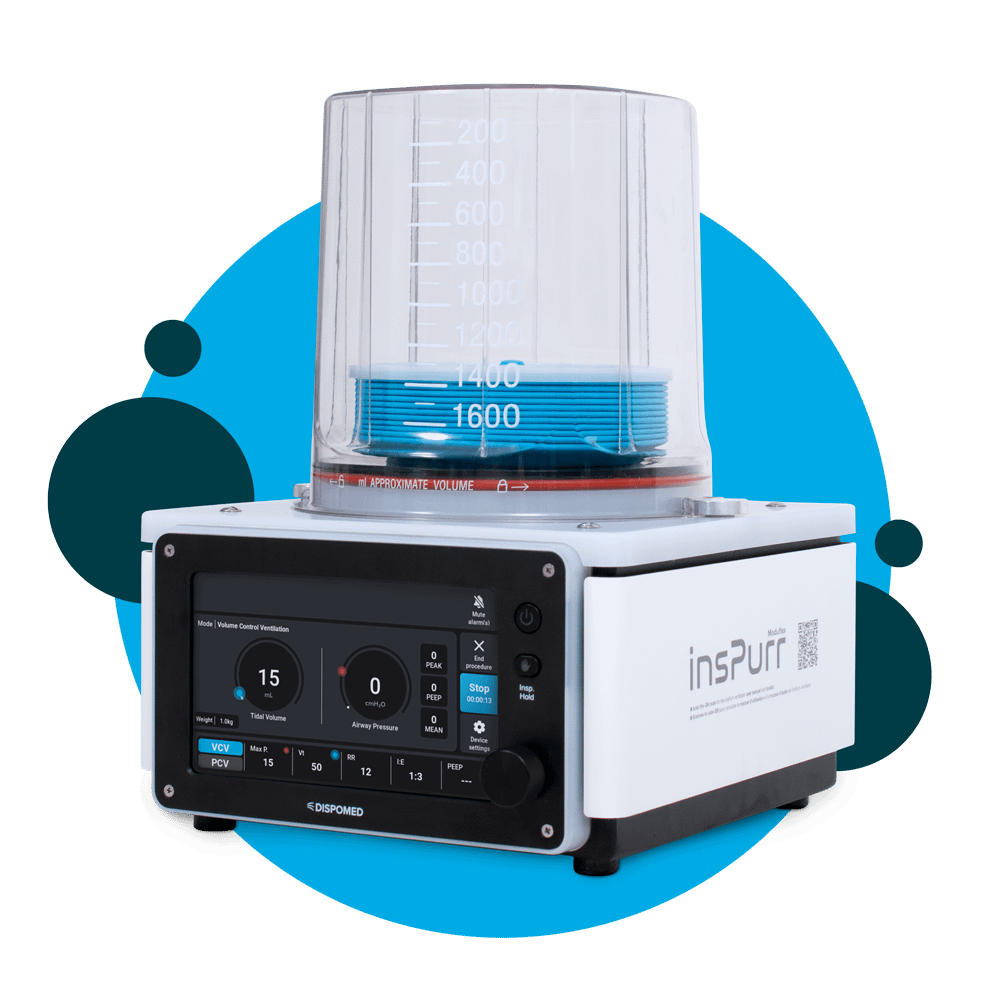
Table of Contents
Overview
Welcome to the InsPurr Veterinary Ventilator End User Manual. This comprehensive guide is designed to provide veterinarians, veterinary technicians, and clinic staff with the necessary information to operate and maintain the InsPurr Veterinary Ventilator effectively.
Purpose of the Manual
The primary purpose of this manual is to ensure users have a clear understanding of the InsPurr Veterinary Ventilator’s features, functionality, and proper usage. It serves as a valuable resource for both novice and experienced users, offering step-by-step instructions, safety guidelines, and troubleshooting information.
Intended Audience
This manual is specifically crafted for veterinarians, veterinary technicians, and veterinary clinic owners and staff who are responsible for the operation and maintenance of the InsPurr Veterinary Ventilator. Whether you are a seasoned professional or new to veterinary ventilation technology, this manual aims to provide comprehensive guidance to enhance your experience with the device.
How to Use This Manual
To make the most of this manual, users are encouraged to follow the structured layout of the document. Begin with the “Introduction” for an overview of the manual’s purpose and intended audience. Proceed through each section sequentially for a thorough understanding of the InsPurr Veterinary Ventilator, from setup and operation to maintenance and troubleshooting.
In case of any queries or issues, refer to the “Contact Information for Support” section for assistance. The glossary and index at the end of the manual offer quick reference points for terms and topics discussed throughout the document.
Thank you for choosing the InsPurr Veterinary Ventilator. We trust this manual will serve as a valuable companion in optimizing the performance of this advanced veterinary ventilation device.
Safety informations
Ensuring the safety of both patients and users is paramount when operating the InsPurr Veterinary Ventilator. Before using the device, it is crucial to thoroughly understand and adhere to the safety guidelines outlined in this section.
Personnel Qualifications
Only trained and qualified veterinary professionals should operate the InsPurr Veterinary Ventilator. Ensure that users have a comprehensive understanding of respiratory support and ventilation principles.
Device Location
The device is designed to maintain optimal performance and safety across varying environmental conditions. It can operate seamlessly within an ambient room temperature range of 15°C to 35°C, ensuring reliable functionality in diverse clinical settings. Additionally, the ventilator can function effectively under atmospheric pressure conditions ranging from 75kPa to 106kPa. Placing the ventilator in a well-ventilated and easily accessible area is crucial to prevent overheating. Users should avoid obstructing air intakes and exhausts to facilitate proper airflow. It is important to shield the device from extreme temperatures, high humidity, and direct sunlight, ensuring the ventilator’s sustained performance and longevity in varied healthcare environments.
Electrical Safety
Use only the recommended power source and ensure it complies with the specified electrical requirements. Regularly inspect power cords for damage, and do not operate the device if the cord is compromised.
Emergency Procedures
Familiarize yourself with emergency shutdown procedures. Always have a backup ventilation plan in case of device malfunction or power failure.
Warnings and Cautions
User Alert Symbols
Pay close attention to symbols used in this manual and on the device. These symbols indicate important warnings or precautions that must be followed for safe operation.
Alarm Response
Respond promptly to alarms. Familiarize yourself with alarm tones and meanings. In case of continuous alarms or unexpected device behavior, discontinue use and contact technical support.
Preventing Contamination
Follow recommended cleaning and sterilization procedures to prevent cross-contamination between patients. Use only approved cleaning agents and follow the specified intervals for maintenance.
Symbols Used in this Manual
Refer to the provided symbol key to understand the meaning of symbols used throughout the manual. Symbols convey important information about warnings, precautions, and actions to be taken.
Compliance to EU directives
Identify the manufacturer of the product
Identify the manufacturer’s serial number
Identify the location where the operator’s manual is stored
Indicate how to lock and unlock for installation and removal of the bellows housing
Indicate how to lock and unlock for installation and removal of the bellows housing
Power on/off switch
WEE marking, Compliance to EU directives
Identify the manufacturer’s catalogue number
Indicate the manufactured date of the product
Indicate that caution is necessary when operating the device
MR Unsafe – do not use with magnetic resonance imaging (MRI)
Identify any terminal which is intended for connection to an external conductor for protection against electric shock in case of a fault, or the terminal of a protective earth (ground) electrode.
Product Description
Features
The InsPurr Veterinary Ventilator is a state-of-the-art respiratory support device designed to meet the specific needs of veterinary professionals. Packed with advanced features, it offers:
Intuitive User Interface
The ventilator boasts an easy-to-navigate user interface, providing quick access to ventilation modes, parameters, and monitoring screens. The clear and concise display enhances user experience.
Versatile Ventilation Modes
Equipped with a range of ventilation modes, including controlled and assisted modes, the InsPurr Ventilator caters to various patient needs. It allows for precise pressure or volume controlled, respiratory rate, and other critical parameters.
Patient Monitoring Capabilities
The Inspurr device offers advanced patient monitoring capabilities, providing real-time oversight of crucial parameters throughout ventilation procedures. The incorporation of a sophisticated volume sensor enables the continuous monitoring of key metrics, including tidal volume, pressure and respiratory rate. This innovative feature ensures comprehensive and accurate data on inspired volumes and pressures, enhancing the precision and safety of the ventilation process. The real-time feedback provided by the Inspurr device empowers veterinary professionals with the information needed to make informed decisions, contributing to optimal patient care and well-being during respiratory interventions.
Compact and Portable Design
The ventilator is designed with portability in mind, featuring a compact and lightweight construction. Its versatility makes it suitable for both clinical settings and transport situations.
Alarms and Safety Features
Built-in alarms alert users to deviations from set parameters, ensuring timely intervention. Safety features include backup power options and emergency shutdown protocols.
Technical Specifications
Ventilation Modes
- Controlled Ventilation (CV)
- Manual Ventilation (MV)
Patient Range
the patient weight range for the device is recommended to be from 1 kg to 100 kg. The rationale behind this specification is based on the maximum capacity of the bellows, which is 1.6L. Taking into account that the maximum volume per breath for a dog is typically 10-15 mL/kg, this translates to a maximum patient weight of approximately 100 kg. It is important to note that this figure is an approximation, as each patient is unique. Factors such as body conformation and overall health may vary, and this recommended weight range may not be universally applicable to all patients, both within and outside of this specified range. Users should exercise discretion and consider individual patient characteristics when using the Inspurr device.
Ventilation Parameters
- Tidal Volume
- Respiratory Rate
- Inspiratory/Expiratory Ratio
- Positive End-Expiratory Pressure (PEEP)
Display
High-resolution 7 inch color LCD with touchscreen display.
Power Requirements
- Standard power supply with backup options for uninterrupted operation.
- Voltage 100-240VAC at 50-60 Hz
- Power 100 watts
- Fuse rating 1.5 amp fast blow
Physical specifications and environmental
Operating temperature 15 to 35 degrees celcius.
- Height: 12.96″ (32.9 cm)
- Width: 9.60″ (24.4 cm)
- Depth: 11.38″ (28.9 cm)
- Weight: 5.45 kg (12 lbs)
- Length of the electrical cables: 8′ (243.84 cm)
Components Included


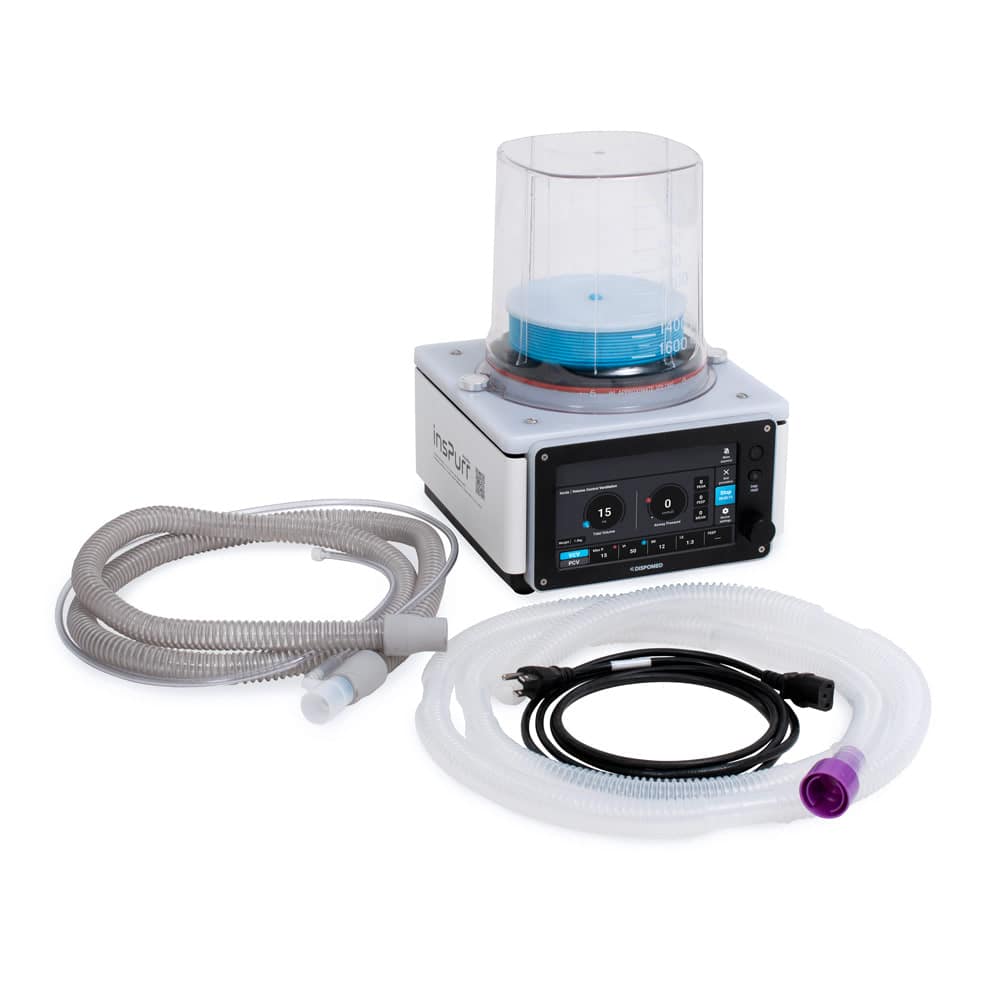
Power Cord
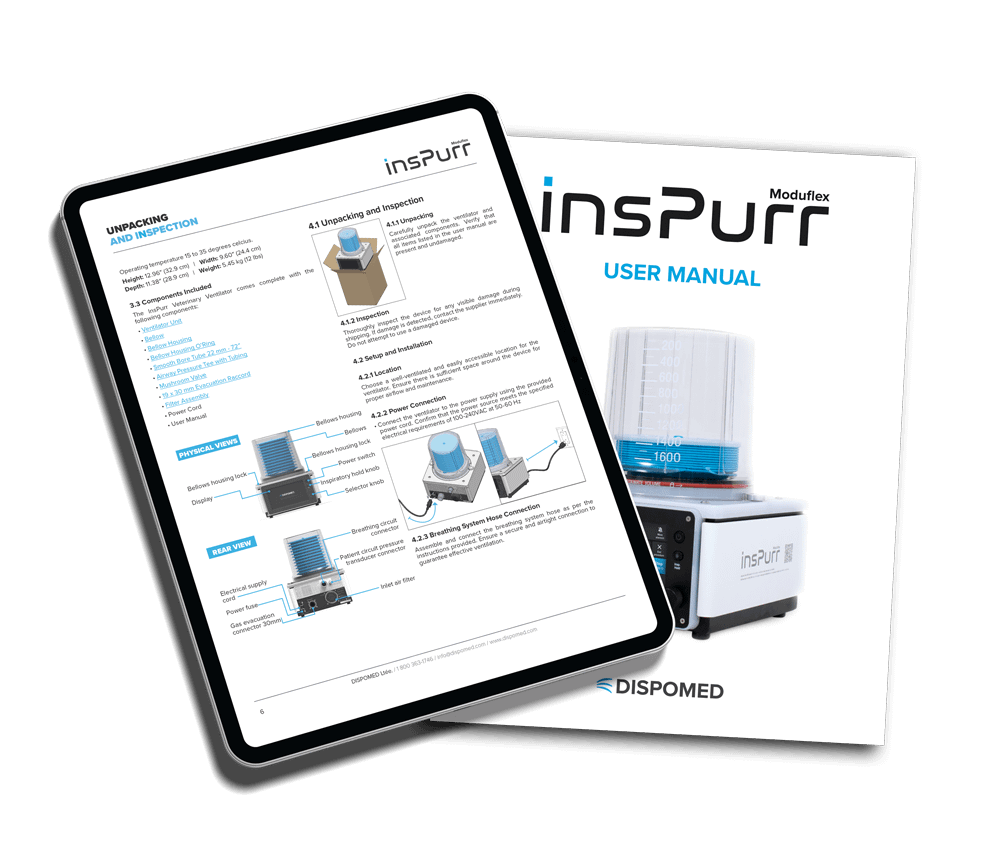
Access to User Manual
Physical View

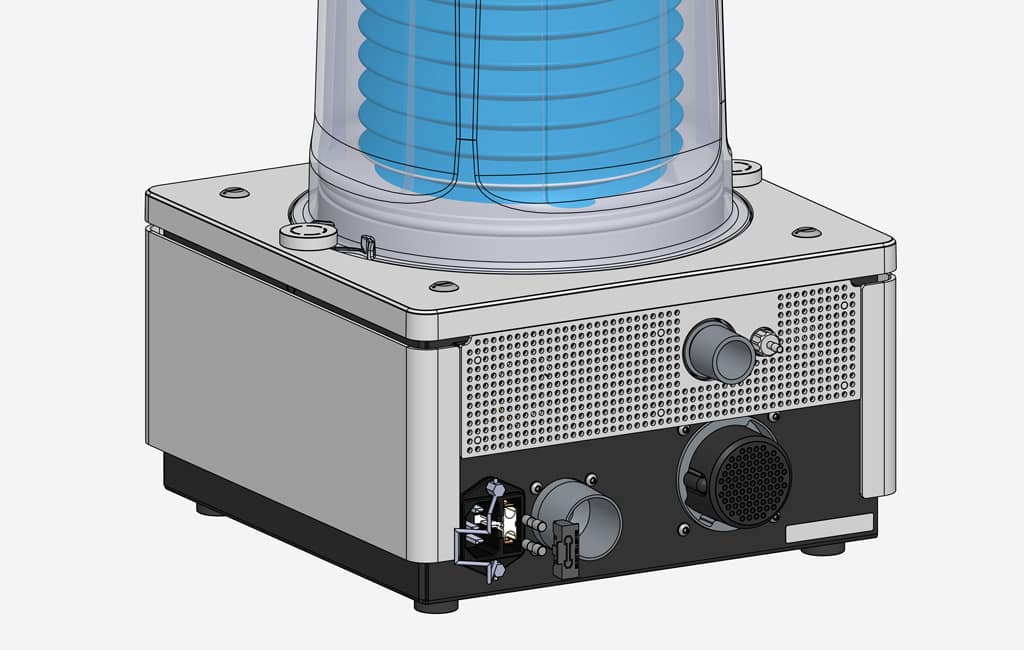
Rear View

Unpacking and Inspection
Unpacking
Carefully unpack the ventilator and associated components. Verify that all items listed in the user manual are present and undamaged.

Inspection
Thoroughly inspect the device for any visible damage during shipping. If damage is detected, contact the supplier immediately. Do not attempt to use a damaged device.
Setup and Installation
Location
Choose a well-ventilated and easily accessible location for the ventilator. Ensure there is sufficient space around the device for proper airflow and maintenance.
Power Connection
Connect the ventilator to the power supply using the provided power cord. Confirm that the power source meets the specified electrical requirements of 100-240VAC at 50-60 Hz.

Breathing System Hose Connection
Assemble and connect the breathing system hose as per the instructions provided. Ensure a secure and airtight connection to guarantee effective ventilation.
Power On/Off
Powering On
Press and hold the power button until the startup sequence initiates. Once the ventilator is ready for operation, the display will indicate readiness with a single beep and a white light (solid, not flashing).

Powering Off
To power off the ventilator press and hold the power button for 3 seconds by/or selecting the shutdown option from the menu. Click the “Yes” button to power off the device. The device shutdown screen will appear.


With these steps, you’ve successfully started the journey with the InsPurr Veterinary Ventilator. Proceed to the next sections of the manual for detailed information on the user interface, ventilation modes, and operational instructions. If you encounter any issues during setup, refer to the troubleshooting section or contact technical support for assistance.
User Interface
The user interface of the InsPurr Veterinary Ventilator is designed for ease of use, providing quick access to vital controls and monitoring features. Familiarizing yourself with the interface will enhance your ability to operate the device efficiently.
Display Overview
Touchscreen Display
The 7’’ high-resolution (800 x 480) touchscreen display serves as the primary interaction point. It provides a clear view of ventilation parameters, patient monitoring data, and system status.
Display Layout
- Main Screen: Displays real-time patient information, including tidal volume, respiratory rate, and alarms.
- Menu Bar: Located at the top or bottom of the screen, the menu bar provides access to different functions and settings.
- Navigation Controls: Use the touchscreen to navigate through menus, adjust settings, and select options.
Status Indication Lights
The device incorporates clear operating status indication lights on its front panel to provide users with immediate visual feedback.
- Blue light (solid, not flashing): Indicates ongoing ventilation with no alarms.
- White light (solid, not flashing): Represents non-operational state or alert, signaling issues or inactivity.
Navigation Controls
Main Menu
Access the main menu by tapping the menu icon. From here, you can navigate to various sections, including ventilation modes, settings, and alarms.
Quick Controls
Commonly used controls, such as adjusting tidal volume or respiratory rate, may have dedicated on-screen buttons for quick adjustments.
Menu Structure
Ventilation Modes
Navigate to the ventilation modes section to select the appropriate mode for your patient. Options include Controlled Ventilation (CV) and Manual Ventilation (MV).
Settings
Access the settings menu to configure parameters such as tidal volume, respiratory rate, and alarms. Ensure settings align with the specific requirements of your patient.
Monitoring
View real-time patient data, including graphical representations of tidal volume and respiratory rate. Monitoring screens provide valuable insights into the effectiveness of ventilation.
Alarms
Review and configure alarm settings. Acknowledge and troubleshoot alarms promptly to ensure patient safety.
Alarm Silence and Reset

In the event of alarms, quickly silence audible by pressing the alarm button. the silent mode will persist for a duration of 2 minutes, after which, if the alarm still persists, it will resume beeping. Alternatively, reset the system from the main screen. Always promptly investigate and address the cause of alarms.
Familiarize yourself with the user interface by exploring each section of the menu. Practice navigating through different screens to build confidence in using the InsPurr Veterinary Ventilator effectively. Detailed operational instructions for each menu option can be found in subsequent sections of this manual.
Operating Instructions
Operating the InsPurr Veterinary Ventilator involves a series of steps to set up, control ventilation parameters, and monitor the patient. Follow the guidelines below for a comprehensive understanding of the operating procedures.

First Time Use
Select the Device Setting Button.
General Settings
- Select your preferred language between French and English
- Modify your maximum inspiratory hold duration as necessary. The default setting for the maximum inspiratory hold duration is 10 seconds, with a selectable range between 5 to 30 seconds.

Measurement Units
Select your pressure units, volume units and weight units value preference.

Event Log
Previous alarm will be displayed in this menu.

Time and Date
Program the time and date.

Press the “Exit” button to return to the main menu.
System Startup Settings
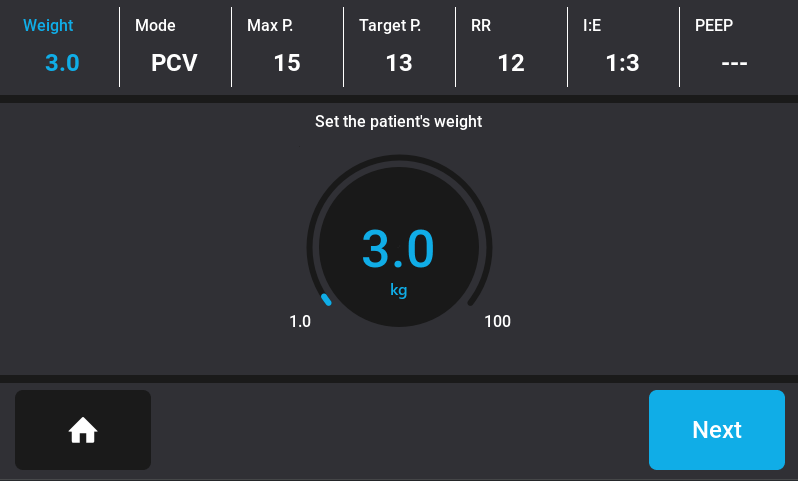
- Select the New Patient button or Last Patient (if this is not the first time using the insPurr ventilator).
- Set the patient’s weight

Mode Selection
Choose the desired ventilation mode.

Volume-Controlled Ventilation (VCV)
Select “Volume-Controlled Ventilation (VCV).”

OR
Pressure-Controlled Ventilation (PCV)
- Select “Pressure-Controlled Ventilation (PCV).”
- Press next

Setting Ventilation Parameters
Preset Parameters
Maximum Pressure
The maximum pressure setting on the device is consistently maintained at 10 cmH2O, regardless of the patient’s weight. This standardized maximum pressure ensures a uniform and reliable threshold for respiratory support, offering simplicity and ease of use for veterinary professionals.
Tidal Volume
The parameter settings for volume on the device are established using a straightforward and clinically relevant formula: volume (mL) = weight (kg) * 10 (mL/kg). This formula considers the patient’s weight as a fundamental factor in determining the appropriate volume for ventilation. By multiplying the weight in kilograms by the standard volume-per-kilogram value of 10 mL, the device ensures that the set volume aligns with the individualized needs of the patient. This approach not only simplifies the calibration process but also promotes precision in delivering tailored respiratory support.
Respiratory Rate
The ventilator ensures user convenience by displaying default respiratory rate values based on the patient’s weight. For patients weighing less than 10 kg (22 lb), the default respiratory rate is set at 12 breaths per minute (bpm). In the weight range of 10 kg (22 lb) to 30 kg (66 lb), the default respiratory rate is 10 bpm. For patients exceeding 30 kg (66 lb) in weight, the default respiratory rate is set to 8 bpm.
| Weight | Max P | VT | RR | I:E |
|---|---|---|---|---|
| 1kg to 10kg (22lbs) | 10 cmH2O | volume (ml) = weight (kg) *10 (ml/kg) | 12 bpm | 1:3 |
| 10kg (22lbs) to 30kg (66lbs) | 10 cmH2O | volume (ml) = weight (kg) *10 (ml/kg) | 10 bpm | 1:3 |
| 30kg (66lbs) to 100kg (220lbs) | 10 cmH2O | volume (ml) = weight (kg) *10 (ml/kg) | 8 bpm | 1:3 |
Adjustment for the Parameters
Parameters Live Adjustment
The device maintains uninterrupted ventilation even during parameter adjustments. It waits for user confirmation before applying the new setting at the next breathing cycle, ensuring a controlled and seamless transition without compromising respiratory support. This feature allows quick parameter fine-tuning without disruption to ongoing ventilation procedures.
Maximum Pressure
- Select the Maximum Pressure (Max P) button menu and adjust as needed.
- Confirm the chosen maximum pressure before initiating ventilation. The adjustable range spans is from 7 to 60 cmH2O with a increment of 1cmH20, providing a comprehensive spectrum to accommodate diverse clinical scenarios. The device airway pressure measurement accuracy is of +/- 10%.
- To enhance user convenience and flexibility, the adjustment of the maximum pressure on the Inspurr device can be seamlessly achieved through a combination of the touchscreen and the rotary knob.
Tidal Volume
- Select the Tidal Volume (VT) button menu and adjust as needed.
- Confirm the chosen tidal volume before initiating ventilation. The adjustable tidal volume range is from 50 mL to 1500 mL, with increments as fine as 1 mL, allowing veterinary professionals to fine-tune ventilation parameters with a high level of precision. The device’s volume delivery accuracy is meticulously maintained relative to the tidal volume setting. For volumes greater than 100 mL, the accuracy is better than or equal to ±10%. For volumes less than or equal to 100 mL, the accuracy remains within ±10%. This measured volume accuracy ensures reliable and consistent performance, enhancing the overall efficacy and safety of the Inspurr device in delivering optimal tidal volumes during ventilation.
- To enhance user convenience and flexibility, the adjustment of the tidal volume on the Inspurr device can be seamlessly achieved through a combination of the touchscreen and the rotary knob.
Respiratory Rate
- Select the respiratory rate (RR) button menu and adjust as needed.
- Confirm the chosen respiratory rate before initiating ventilation. The device allows users to set the respiratory rate within a range of 2 to 30 breaths per minute, offering fine adjustments with increments of 1 breath per minute. This level of granularity allows veterinary professionals to tailor ventilation parameters to the specific requirements of each patient. The InsPurr device boasts an accuracy of +/- 10%, ensuring that the delivered respiratory rate aligns closely with the user-defined settings.
- To enhance user convenience and flexibility, the adjustment of respiratory rate on the Inspurr device can be seamlessly achieved through a combination of the touchscreen and the rotary knob.
Inspiratory/Expiratory Ratio (I:E)
- Select the Inspiratory/Expiratory Ratio (I:E) button menu and adjust as needed.
- Confirm the selected Inspiratory/Expiratory Ratio (I:E) before initiating ventilation. The adjustment can be made using the following values: 1:1, 1:2, 1:3, 1:4, or 1:5. The device maintains an I:E ratio accuracy that is better than or equal to ±10% relative to the set I:E ratio.
- To enhance user convenience and flexibility, the adjustment of the Inspiratory/Expiratory Ratio (I:E) on the Inspurr device can be seamlessly achieved through a combination of the touchscreen and the rotary knob.
Positive End Expiratory Pressure (PEEP)
- Select the Positive End Expiratory Pressure (PEEP) button menu and adjust as needed.
- Confirm the selected Positive End Expiratory Pressure (PEEP) before initiating ventilation. The device allows the user to either disable PEEP (off) or activate it within a range of 2 to 10 cmH2O, with adjustments available in increments of 1 cmH2O. It is important to note that the PEEP level cannot be set higher than the maximum working pressure.
- To enhance user convenience and flexibility, the adjustment of the Positive End Expiratory Pressure (PEEP) on the Inspurr device can be seamlessly achieved through a combination of the touchscreen and the rotary knob.
Inspiratory Hold

- Press the inspiratory hold button to initiate the inspiratory hold, during which the breathing cycle is paused at the end of the current or next inspiration for as long as the button is pressed (no expiration allowed). A blue message will display the elapsed time of the inspiratory hold once activated.
- The inspiratory hold ceases either when the set maximum duration is achieved or upon releasing the button, at which point the breathing cycle resumes. Throughout the inspiratory hold, any apnea or sustained airway pressure alarms triggered by the hold are audio or alarm paused for the inspiratory-hold duration.
- The maximum inspiratory-hold time for a non-adjustable inspiratory hold is 10s, while a configurable or adjustable inspiratory hold can range from 5 to 30 seconds, with increments of 1s (default value is 10 seconds), set via the touchscreen and rotary knob.
- The ventilator automatically resumes the breathing cycle when the inspiratory hold reaches the maximum allowed duration, even if the inspiratory hold button is still pressed.
Monitoring Patient Parameters
Real-Time Monitoring
Review real-time patient data, including tidal volume and respiratory rate through the general screen. Ensure that monitored parameters fall within acceptable ranges.

Alarms
Whenever there is a parameter that is too low or too high you will be notified by a visual and audible alarm. A message will also be displayed on the top of the screen.
The visual alarm will be both noticeable by the led light changing from green to red and the associated parameter changing from blue to red.

Activation and Behaviour of Alarms
Certain alarms within the system are marked with an asterisk (*) in the trigger column. These alarms behave in the following manner:
Initially, these alarms are deactivated for the first 5 breathing cycles of the procedure, or when a user modifies a parameter. However, as ventilation begins or when a user adjusts settings, these warning alarms (non-critical alarms) may activate temporarily while the system stabilizes.
Criticity Risks
The Criticity column indicates the level of risk associated with each alarm:
- ERROR: Critical error preventing immediate use of the device. If this occurs, the system will restart. However, if the restart does not resolve the issue, it indicates a hardware problem, and the unit must be repaired.
- FAULT: Major issue that could jeopardize patient safety. Immediate action by the user is required to resolve the situation. The alarm will persist until the user rectifies the issue.
- WARNING: Minor issue where ventilation does not meet the user’s settings. This could be benign (e.g., animal coughing) or indicate a physiological issue with the patient (e.g., pneumothorax).
- INFO: No immediate issue, but maintenance is required to preserve the integrity of the unit.
In cases of FAULT and WARNING, the issue may arise from either the ventilation circuit (e.g., disconnected tube) or the patient. The message prioritizes potential causes by likelihood. It is the user’s responsibility to identify the cause and resolve the issue promptly.
Alarm Legends
| Patient Airway Pressure Above Safety Limit | |
|---|---|
| Type | Physiological |
| Mode | VCV and PCV |
| Priority | FAULT |
| Message displayed | Airway pressure too high |
| Trigger | As soon as the airway pressure exceeds the user maximum pressure setting |
| Termination | When airway pressure goes below the user maximum pressure setting |
| Max Mute Time | 0s (mute not allowed) |
| Action by the device | Stop inspiration, perform a full expiration, then perform a new inspiration only when the alarm is deactivated |
| Detailed Message Displayed | 1. Inappropriate settings (Vt too high) or O2 flow too high |
| 2. Patient spontaneously breathing against ventilator | |
| 3. Obstruction of endotracheal tube, respiratory circuit or ventilator tube | |
| 4. Decrease of lung compliance | |
| 5. Obstruction of ventilator exhaust | |
| Patient airway pressure too high (but below safety limit) during expiration | |
|---|---|
| Type | Physiological |
| Mode | VCV and PCV |
| Priority | FAULT |
| Message displayed | High airway pressure during expiration |
| Trigger | After 33% of expiration time, airway pressure has not decreased by more than 60% of the difference between the pressure value at the beginning of expiration and the PEEP target. Alarms applies only if pressure at the beginning of expiration is at least 6cmH2O |
| Termination | When airway pressure goes below (PEEP + 20%) or below 6 cmH2O if PEEP is off |
| Max Mute Time | 0s (mute not allowed) |
| Action by the device | As long as the alarm is active, continue to perform an expiration. Once the alarm is deactivated, start another expiration with the same PEEP. Then, start a new inspiration |
| Detailed Message Displayed | 1. Patient spontaneous breathing against ventilator |
| 2. O2 flow too high | |
| 3. Obstruction of ventilator exhaust | |
| 4. External pressure on patient thorax | |
| Negative patient airway pressure | |
|---|---|
| Type | Physiological |
| Mode | VCV and PCV |
| Priority | FAULT |
| Message displayed | Negative airway pressure |
| Trigger | Airway pressure falls -5cmH2O below atmospheric pressure for more than 450ms |
| Termination | When airway pressure goes above -5cmH2O |
| Max Mute Time | 0s (mute not allowed) |
| Action by the device | none (continue ventilation) |
| Detailed Message Displayed | Patient spontaneous breathing against ventilator |
| The fan is reporting a fault (not connected) | |
|---|---|
| Type | Technical |
| Mode | Standby VCV and PCV |
| Priority | FAULT |
| Message displayed | Fan fault (fire hazard) |
| Trigger | Fan not connected or not spinning |
| Termination | When fan fault is resolved |
| Max Mute Time | 0s (mute not allowed) |
| Action by the device | If an operation is ongoing, continue ventilation and inform the user. Otherwise, lock down the device and inform the user |
| Detailed Message Displayed | If an operation is ongoing, fault alarm with following instructions in alarm details :
1. Promptly power off the device. 2. Disconnect the power cord. 3. Contact the manufacturer for maintenance. Otherwise, lockdown screen with following instructions : Promptly power off the device, disconnect the power cord and contact the manufacturer for maintenance. |
| Patient airway pressure abnormally low | |
|---|---|
| Type | Technical |
| Mode | VCV and PCV |
| Priority | FAULT |
| Message displayed | Abnormally low pressure |
| Trigger | Airway pressure remains under 1 cmH2O for more than 450 ms when the turbine speed is higher than 20% |
| Termination | When airway pressure goes above 1 cmH2O |
| Max Mute Time | 0s (mute not allowed) |
| Action by the device | Stop respiration, wait for 1 second, retry to reach baseline (PEEP) and start a new respiration |
| Detailed Message Displayed | 1. Disconnected pressure hose |
| 2. Leak in endotracheal tube, anesthesia circuit or ventilator tube | |
| 3. Patient continuously breathing against ventilator | |
| Patient airway pressure too low during inspiration | |
|---|---|
| Type | Physiological |
| Mode | VCV and PCV |
| Priority | FAULT |
| Message displayed | Low airway pressure during inspiration |
| Trigger | Pressure below 6cmH2O after 90% of inspiration time, excluding the first 5 cycles of ventilation (new parameters or live parameter adjustment) |
| Termination | When airway pressure is above 6cmH2O after 90% of inspiration time |
| Max Mute Time | 120s |
| Action by the device | none (continue ventilation) |
| Detailed Message Displayed | 1. Inappropriate ventilator settings (VT too low) |
| 2. Patient spontaneous breathing with ventilator | |
| 3. Leak in endotracheal tube, anesthesia circuit or ventilator tube | |
| 4. Bellows not properly filled at the start of inspiration | |
| 5. Airway pressure measurement tubing disconnected | |
| Measured volume above tidal volume setting | |
|---|---|
| Type | Physiological |
| Mode | VCV only |
| Priority | WARNING |
| Message displayed | Tidal volume above target |
| Trigger | Measured volume above tidal volume setting (+20%) for 2 consecutive respiratory cycles, excluding the first 5 cycles of ventilation (new parameters or live parameter adjustment) |
| Termination | When volume is on target (±20%) for 2 consecutive cycles |
| Max Mute Time | 120s |
| Action by the device | none (continue ventilation) |
| Detailed Message Displayed | 1. Patient spontaneous breathing with ventilator |
| 2. Sudden change of lung compliance | |
| Measured PIP above PIP target | |
|---|---|
| Type | Physiological |
| Mode | PCV only |
| Priority | WARNING |
| Message displayed | PIP above target |
| Trigger | Measured PIP above PIP setting (+2cmH2O) for 2 consecutive respiratory cycles, excluding the first 5 cycles of ventilation (new parameters or live parameter adjustment). |
| Termination | When PIP is on target (±2cmH2O) for 2 consecutive cycles. |
| Max Mute Time | 120s |
| Action by the device | none (continue ventilation) |
| Detailed Message Displayed | 1. O2 flow too high |
| 2. Patient spontaneous breathing against ventilator | |
| 3. Obstruction of endotracheal tube, respiratory circuit or ventilator tube | |
| 4. Decreased compliance (pressure on chest wall, pneumothorax, etc.) | |
| Measured PEEP above PEEP target | |
|---|---|
| Type | Physiological |
| Mode | VCV and PCV |
| Priority | WARNING |
| Message displayed | PEEP above target |
| Trigger | Measured PEEP above PEEP setting (+20%) for 5 consecutive respiratory cycles, excluding the first 5 cycles of ventilation (new parameters or live parameter adjustment). |
| Termination | When PEEP is on target (±20%) for 5 consecutive cycles. If PEEP is off, the PEEP target is 3cmH2O. |
| Max Mute Time | 120s |
| Action by the device | none (continue ventilation) |
| Detailed Message Displayed | 1. Patient spontaneous breathing against ventilator |
| 2. O2 flow too high | |
| 3. External pressure on patient thorax | |
| 4. Obstruction of ventilator exhaust | |
| 5. If none of the above applies, decrease PEEP target or turn PEEP off | |
| Measured volume below tidal volume setting | |
|---|---|
| Type | Physiological |
| Mode | VCV only |
| Priority | WARNING |
| Message displayed | Tidal volume below target |
| Trigger | Measured volume below tidal volume setting (-20%) for 2 consecutive respiratory cycles, excluding the first 5 cycles of ventilation (new parameters or live parameter adjustment) |
| Termination | When volume is on target (±20%) for 2 consecutive cycles |
| Max Mute Time | 120s |
| Action by the device | none (continue ventilation) |
| Detailed Message Displayed | 1. Maximum airway pressure limit reached |
| 2. Sudden change of lung compliance | |
| 3. Inappropriate settings (Vt too high or inspiratory time too short) | |
| Measured PIP below PIP target | |
|---|---|
| Type | Physiological |
| Mode | PCV only |
| Priority | WARNING |
| Message displayed | PIP below target |
| Trigger | Measured PIP below PIP setting (-2cmH2O) for 2 consecutive respiratory cycles, excluding the first 5 cycles of ventilation (new parameters or live parameter adjustment) |
| Termination | When PIP is on target (±2cmH2O) for 2 consecutive cycles |
| Max Mute Time | 120s |
| Action by the device | none (continue ventilation) |
| Detailed Message Displayed | 1. Patient spontaneous breathing with ventilator |
| 2. Leak in endotracheal tube, anesthesia circuit or ventilator tube | |
| 3. Bellows not properly filled at the start of inspiration | |
| 4. Sudden change of lung compliance | |
| 5. Airway pressure measurement tubing disconnected | |
| Measured PEEP below PEEP target | |
|---|---|
| Type | Physiological |
| Mode | VCV and PCV |
| Priority | WARNING |
| Message displayed | PEEP below target |
| Trigger | Measured PEEP below PEEP setting (-20%) for 5 consecutive respiratory cycles, excluding the first 5 cycles of ventilation (new parameters or live parameter adjustment). |
| Termination | When PEEP is on target (±20%) for 5 consecutive cycles. If PEEP is off, the PEEP target is 3cmH2O. |
| Max Mute Time | 120s |
| Action by the device | none (continue ventilation) |
| Detailed Message Displayed | 1. Patient spontaneously breathing against ventilator |
| 2. Leak in endotracheal tube, anesthesia circuit or ventilator tube | |
| 3. Bellows empty or not filled enough | |
| 4. Airway pressure measurement tubing disconnected | |
| The turbine temperature is too high | |
|---|---|
| Type | Technical |
| Mode | Standby VCV and PCV |
| Priority | WARNING |
| Message displayed | Turbine temperature too high |
| Trigger | Turbine overheating |
| Termination | When fault is resolved |
| Max Mute Time | 120s |
| Action by the device | none (continue ventilation) |
| Detailed Message Displayed | 1. System overheating may occur |
| 2. Shutting down the device and maintenance are recommended | |
| Battery of the RTC is low | |
|---|---|
| Type | Technical |
| Mode | Standby VCV and PCV |
| Priority | INFO |
| Message displayed | Internal clock (low battery) |
| Trigger | RTC battery low level |
| Termination | When fault is resolved |
| Max Mute Time | 120s |
| Action by the device | none (continue ventilation) |
| Detailed Message Displayed | 1. Date and time may be inaccurate |
| 2. Maintenance is recommended | |
| Critical internal failure | |
|---|---|
| Type | Technical |
| Mode | Always |
| Priority | ERROR |
| Message displayed | No message is displayed, since the system goes in preventive shutdown |
| Trigger | Pressure sensors fault (ADC conversion) |
| Turbine fault | |
| Power supply voltage fault (24V) | |
| Power supply voltage fault (5V) | |
| Flow sensor fault (I2C communication) | |
| Touchscreen fault (I2C communication) | |
| NVSRAM fault (SPI communication) | |
| Termination | When fault is resolved at boot |
| Action by the device | Shutdown the device and latch on boot if the problem is still present |
| Detailed Message Displayed | The device has shut down due to a critical internal failure that persists upon booting. For your safety and to ensure standard operation, please return the device to the manufacturer for maintenance. You may also try to disconnect the power cable, wait for 5 seconds, and turn on the device again. |
Alarm Management
- To temporarily silence the alarm, press the mute button. The alarm will be muted for a duration of X, after which it will resume beeping if the issue persists. The visual alarm will continue to be active.
- The ventilator displays an indication that the auditory alarm signals are muted, and the remaining mute time (countdown from the maximum duration) is shown on the screen.
- The maximum duration for muting auditory alarms is 120 seconds, after which the auditory alarm signals will automatically resume. If a new alarm occurs during the mute period, the auditory signals will be automatically unmuted.
High Alarm
A high alarm on the ventilator signifies a critical condition that
requires immediate attention and intervention. This alarm level
is activated when there is a significant deviation or a potentially
life-threatening situation. Examples of conditions that may trigger
a high alarm include an abrupt change in airway pressure, or a
disconnection in the ventilation circuit. The visual and auditory
signals associated with a high alarm are typically distinctive and
urgent, aiming to alert healthcare providers promptly. In response
to a high alarm, healthcare professionals are expected to take
immediate action to address the underlying issue, potentially
involving adjustments to ventilation settings, airway management,
or other emergency interventions to ensure patient safety and
well-being. The specific parameters and triggers for high alarms
can vary based on the ventilator’s design and the criticality of the
patient’s condition.
Medium Alarm
A medium alarm on the ventilator typically indicates a condition
that requires attention but may not be an immediate threat to
the patient’s well-being. This type of alarm is designed to alert
healthcare providers to a moderate level of concern, prompting
them to assess the situation and make necessary adjustments.
Examples of conditions triggering a medium alarm could include
variations in respiratory parameters or other moderate deviations
from the preset ventilation settings. The visual and auditory cues
associated with a medium alarm are usually distinct, allowing
healthcare professionals to identify and address the issue promptly while maintaining an appropriate level of urgency in patient care. The specific parameters and triggers for medium alarms can vary depending on the ventilator’s design and the patient’s condition.
Alarms Menu
Access the alarms menu to review active alarms.
For each alarm, you will receive some possible solutions on how
to solve the alarm.
In case multiple alarms are raised simultaneously, the ventilator
will indicate that multiple alarms are active and display them in
order of priority. In case multiple alarms have the same priority, the ventilator will display them in their order of occurrence.
Last Patient
You can access your last patient’s parameters by pressing the last patient button located at the bottom left of the ventilator screen. This feature is particularly useful in case of a momentary power outage. Instead of re-entering your last parameters, you can simply select the last patient to regain access to their information.
Maintenance and Care
Proper maintenance and care are essential to ensure the longevity and reliability of the InsPurr Veterinary Ventilator. Follow the guidelines below to keep the device in optimal working condition.
Cleaning and Sterilization
Daily Cleaning
Power Off and Disconnect
- Ensure the veterinary ventilator is powered off.
- Disconnect the ventilator from the power source.
Wear Protective Gear
- Put on appropriate personal protective equipment, such as gloves and a mask, to protect yourself from potential contaminants.
- Wipe down the exterior surfaces with a mild, non-abrasive disinfectant.
- Clean the touchscreen display with a soft, lint-free cloth.
- Ensure all ports and connectors are free from debris.
Breathing System Hose
- Disconnect the breathing system from the anesthesia machine and the ventilator.
- Follow manufacturer guidelines for cleaning or replacing disposable components.
- Sterilize reusable components using an approved method.
Filters
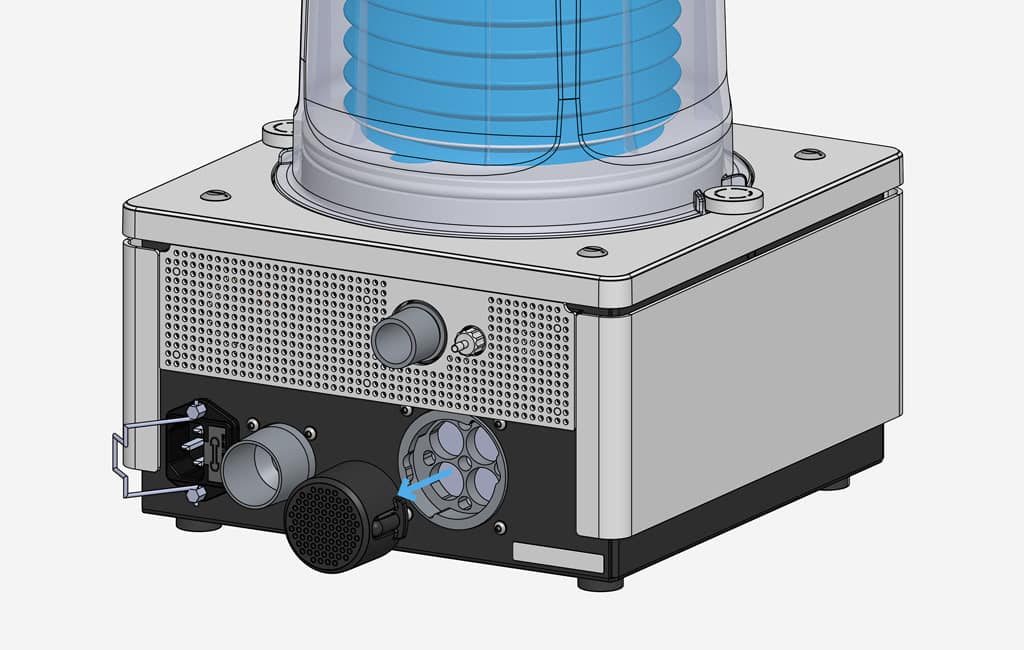
- Monthly inspect the air intake filter. Replace the filter if necessary.
- Clean or replace filters more frequently if operating in a dusty environment.
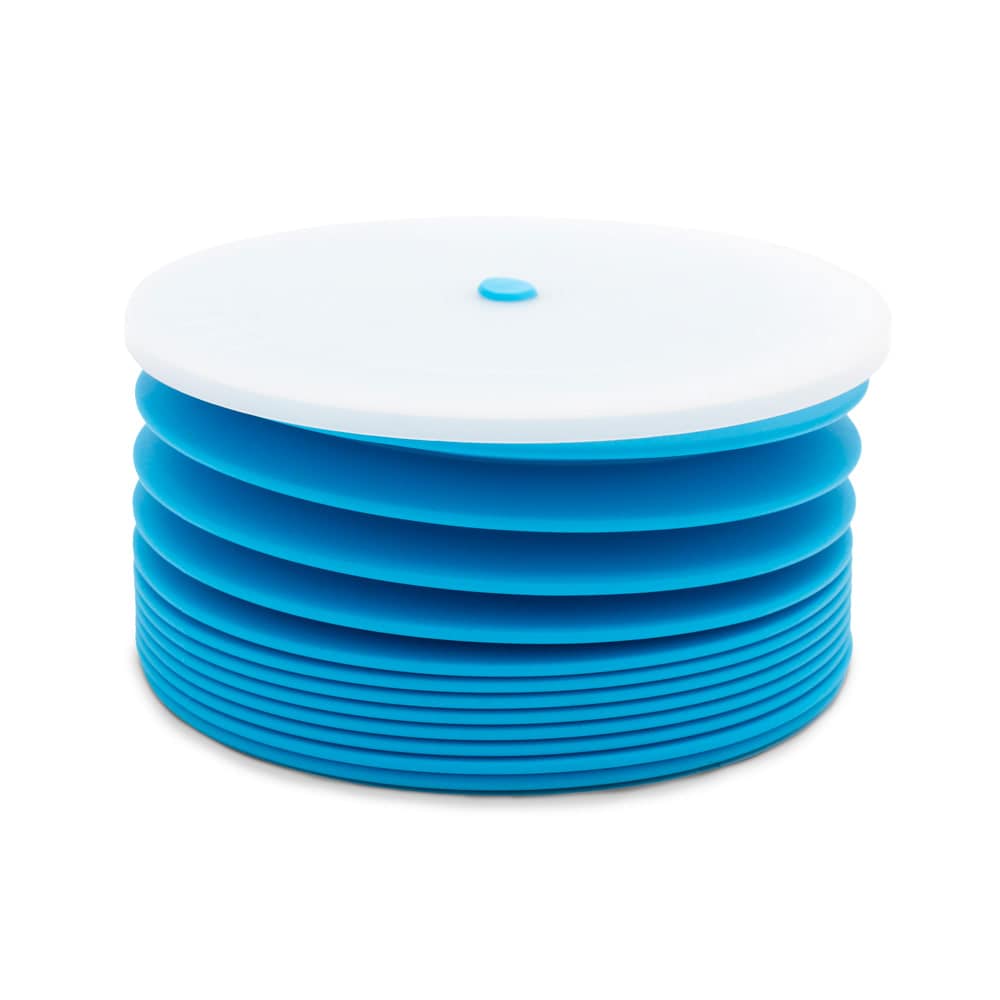
Bellows
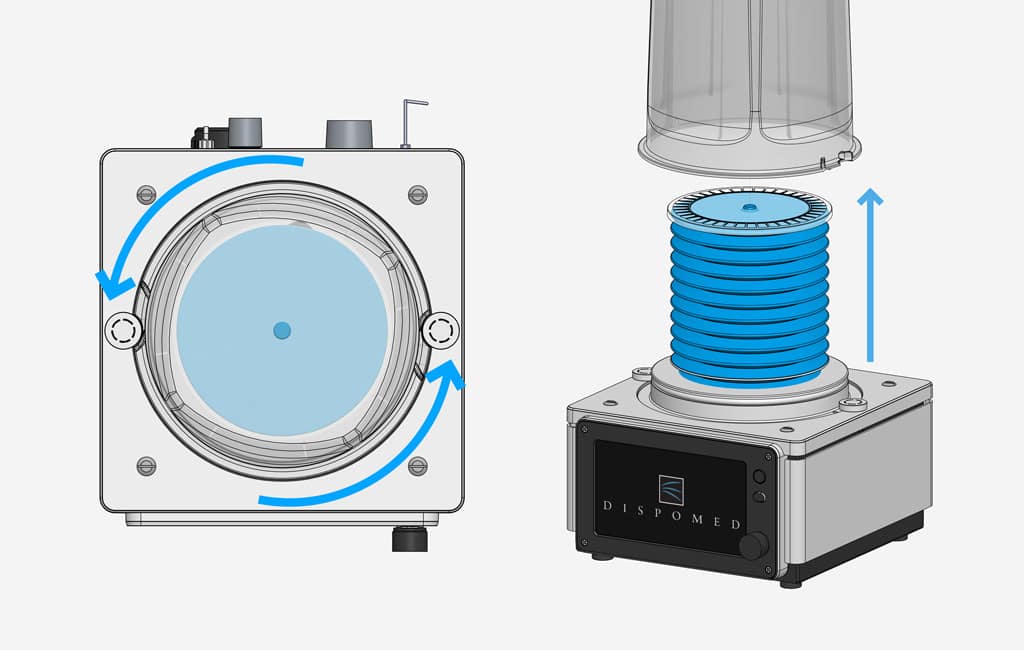
Remove the bellows housing and then carefully remove the silicone bellows from the ventilator.
Inspect for Contaminants
Inspect the bellows for any visible contaminants or signs of wear.
Pre-Cleaning
If there are visible contaminants, gently wipe the surface with a damp cloth or sponge to remove loose dirt and debris.
Cleaning Solution
Prepare a cleaning solution typically, a mild, non-abrasive, and veterinary-approved disinfectant should be used.
Cleaning Process
- Immerse the silicone bellows in the cleaning solution.
- Use a cloth to gently scrub the surface, paying attention to seams and folds where contaminants may accumulate.
Rinse Thoroughly
Rinse the bellows thoroughly with clean water to remove any residue from the cleaning solution.
Disinfection
Follow the manufacturer’s guidelines for disinfecting the silicone bellows. This may involve soaking it in a veterinary-approved disinfectant for a specified duration.
Drying
Allow the silicone bellows to air-dry completely before reattaching it to the ventilator. Ensure it is thoroughly dried to prevent the growth of mold or bacteria.
Reassembly
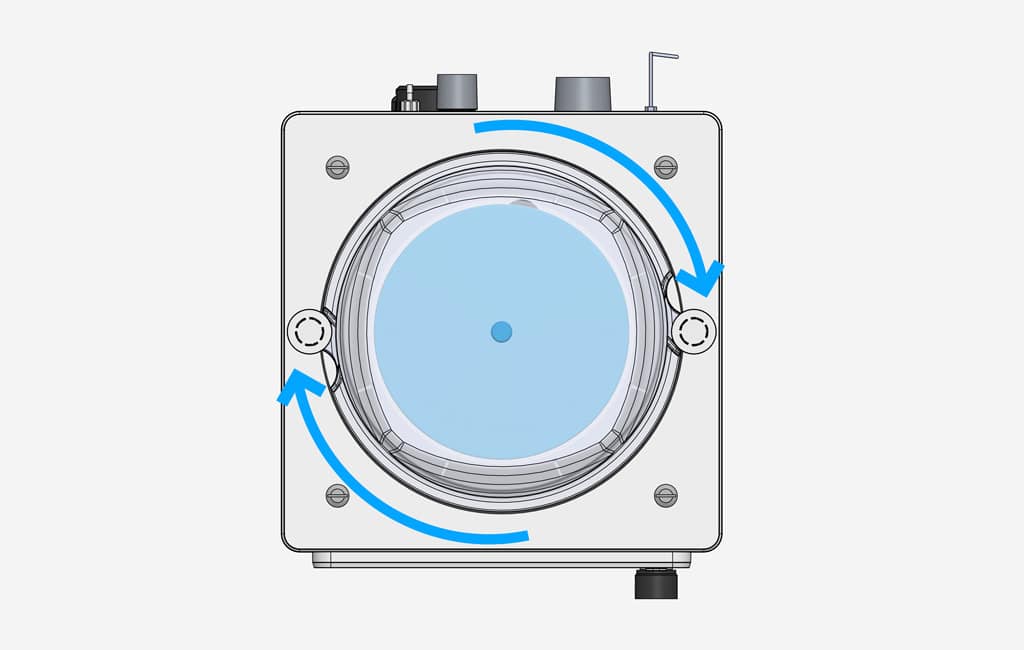
Reassemble the bellows and the bellows housing on the ventilator.
Visual Inspection
- Conduct a visual inspection of cables, hoses, and connectors for signs of wear.
- Check for any loose or damaged parts.
- Ensure labels and markings are legible.
Functionality Check
- Power on the ventilator and perform a quick functionality check.
- Verify that the touchscreen, controls, and alarms are responsive.
- Confirm proper operation of ventilation modes.
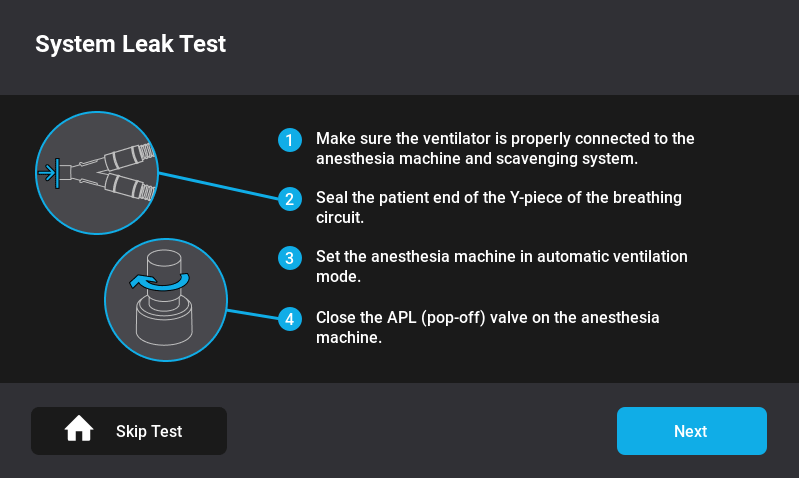
Leak Test
Users must perform a leak test of the ventilator and the anesthesia machine before each use to ensure optimal functionality and patient safety. Follow the seven steps to be ready for ventilator testing.
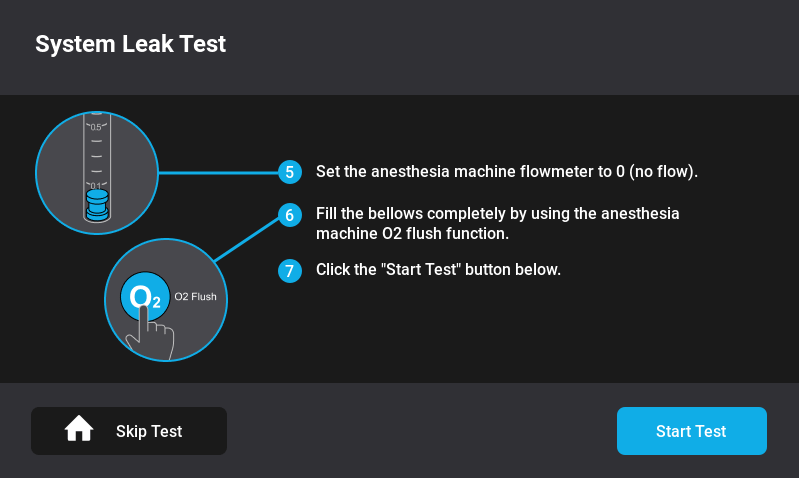
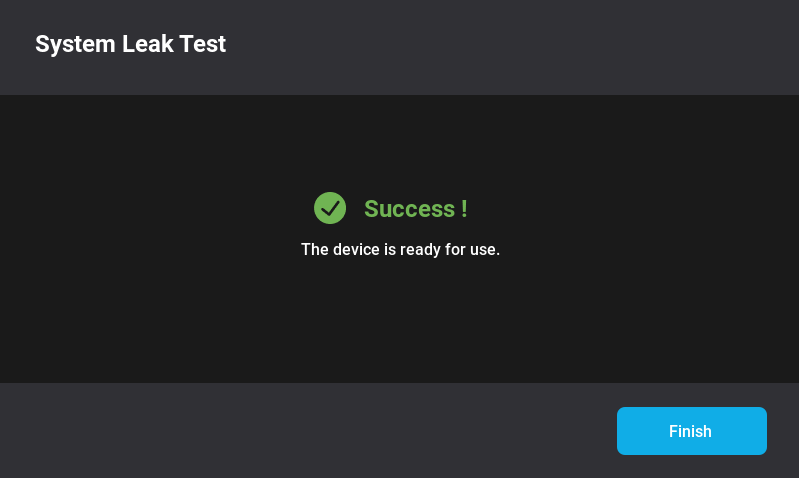
Once these steps are completed, press “Start Test,” and the leak test will automatically begin.
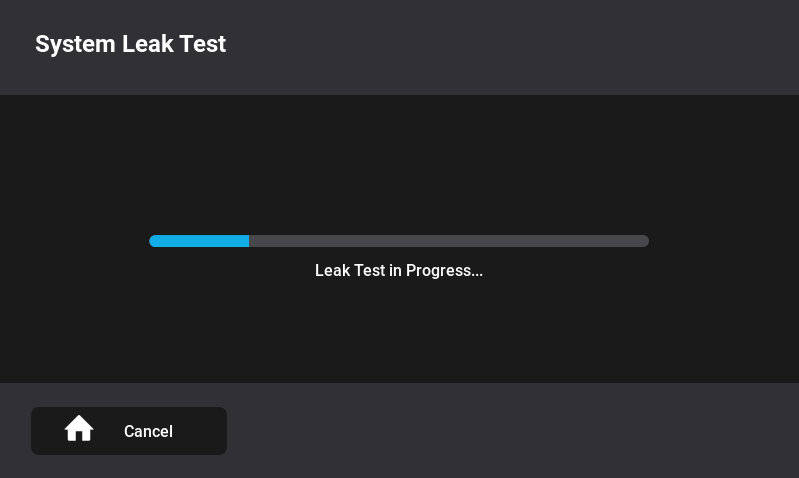
If the leak test passed, the ventilator is ready to use.
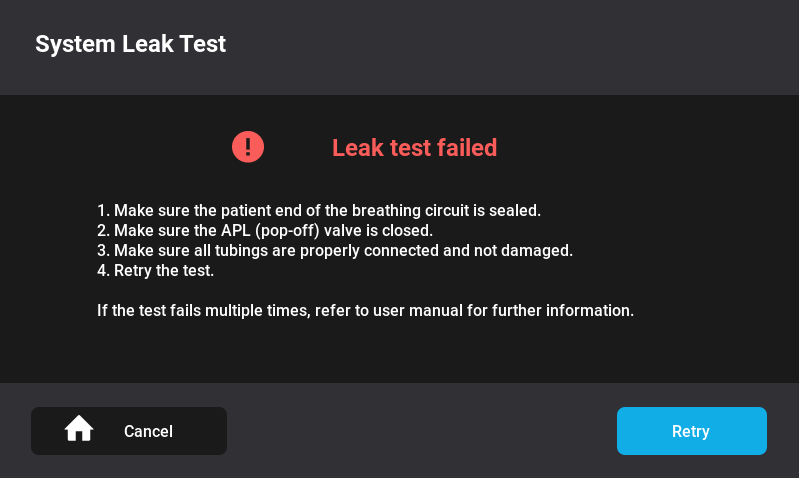
If the leak test failed, follow the four different steps written on the leak test screen. If the test fails again, refer to the troubleshooting section of the manual.
Troubleshooting
In the event of unexpected issues or alarms, the following troubleshooting guide for the InsPurr Veterinary Ventilator can help identify and resolve problems promptly. If you encounter persistent issues, contact technical support for further assistance.
Common Issues
If I have followed the alarm recommendations and the alarm persists, what should I do?
- Review alarm messages on the display
- Address the underlying cause, such as incorrect settings or patient issues.
- Silence alarms only after addressing the cause.
My ventilator is not powering on
- Check power connections and ensure the power source is functional.
- Confirm the power button is pressed and held for the required duration.
- Verify power cord integrity and replace if damaged.
- Verify the fuse at the power inlet.
My Touchscreen is unresponsive
- Clean the touchscreen with a soft, lint-free cloth.
- Ensure the screen is not damaged.
- Restart the ventilator and check for responsiveness.
My Leak Test is failing
If the initial leak test fails, isolate the InsPurr Ventilator from the anesthesia machine to identify the source of the leak.
How to isolate the InsPurr Ventilator
- Remove the InsPurr tubing from the anesthesia machine.
- Seal it with your thumbs or the palm of your hand.
- Follow the steps of the leak test again.
If the test is successful, the ventilator is leak-free. However, a leak may be present in the anesthesia machine, and you should contact your technician for servicing.
What to do if the leak test fails again
- Inspect the InsPurr tubing for any cracks.
- Ensure the connector is securely attached.
- Remove the bellow housing and ensure the O’Ring is properly sealed.
- Ensure there are no cracks in the bellow housing.
- Remove the bellow and ensure there is no cracks.
- Ensure the mushroom valve is flush.
- Reinstall the bellow and housing in place. Make sure it is sealed properly.
- Follow the leak test steps again.
If the leak test is successful, you’re good to go. If the leak test fails again, contact your Dispomed technician for inspection and troubleshooting.
Contact Information for Support
If troubleshooting does not resolve the issue, promptly contact technical support for assistance. Provide detailed information about the problem, any error messages, and the steps you’ve taken to troubleshoot. Technical support can guide you through additional diagnostics or arrange for service if required.
Contact Information
Remember to provide your device’s serial number and any relevant details about your setup when contacting support for a more efficient resolution.
Appendices
Glossary of Terms
This glossary provides definitions for key terms used throughout the InsPurr Veterinary Ventilator manual. Refer to this section for clarification on technical terminology.
| PEEP | Positive end Expiratory Pressure | The pressure in the airways at the end of expiration to prevent alveolar collapse |
|---|---|---|
| VT | Tidal Volume | The volume of air moved into or out of the lungs during one breath |
| RR | Respiratory Rate | The number of breaths taken by a patient in one minute |
| VCV | Volume-Controlled Ventilation | Ventilator is controlled by the volume and limited by the pressure |
| PCV | Pressure-Controlled Ventilation | Ventilator is controlled by the pressure |
Regulatory Compliance
The InsPurr Veterinary Ventilator complies with relevant regulatory standards and certifications. This section provides information on regulatory approvals, ensuring the device meets safety and performance requirements.
Warranty Information
The warranty section outlines the terms and conditions of the product warranty. Refer to this section for details on coverage, duration, and any limitations.
Warranty Coverage
Dispomed Ltd. guarantees the quality of the insPurr ventilator, providing a warranty that covers manufacturing defects for a duration of two (2) years from the date of delivery to the customer. This warranty is applicable when the product is used according to the provided instructions, and prescribed maintenance and service are diligently performed. Dispomed shall not be held responsible for any damage, injury, or loss resulting from the use of the insPurr ventilator if, before such incidents, the product was:
- Damaged, misused, or misapplied.
- Repaired, altered, or modified by a person other than a Dispomed Ltd. technician or approved service personnel.
- Not installed in strict compliance with the instructions provided by Dispomed or the applicable codes and ordinances in place.
- Cleaned using substances that may cause damage, such as alcohol or other harmful products.
- Used with knowledge of a pre-existing defect.
Plastic, rubber, and consumable items are guaranteed to be free of defects at the time of delivery to the customer.
Any insPurr ventilator found to be defective in workmanship or material will, at Dispomed’s discretion, either be repaired or replaced. The warranty does not cover deterioration, wear, or abuse of the unit.
This warranty becomes void if the serial number of the product has been altered, defaced, or removed.
Shipping charges for any unit that needs repair or replacement are the responsibility of the customer.
Exclusions and Limitations
- Normal Wear and Tear: The warranty does not cover the normal wear and tear that occurs with regular use of the insPurr ventilator.
- Consumables: such as bellows, breathing system hose, evacuation hose, and rubber components, are excluded from warranty coverage.
- External Factors: Dispomed shall not be responsible for damage, defects, or malfunctions caused by external factors such as power fluctuations, inadequate power supply, or environmental conditions beyond normal operating parameters.
- Unauthorized Repairs or Modifications: Any repairs or modifications performed by unauthorized personnel or entities, other than Dispomed Ltd. technicians or approved service personnel, will void the warranty.
- Failure to Follow Instructions: The warranty is not applicable if the insPurr ventilator is not used in accordance with the instructions provided by Dispomed or if prescribed maintenance and service are neglected.
- Use of Unauthorized Parts or Consumables: The warranty does not cover issues arising from the use of parts or consumables that are not approved or recommended by Dispomed Ltd.
- Accidents or Misuse: Dispomed shall not be held liable for damage, defects, or malfunctions resulting from accidents, misuse, abuse, neglect, or any other similar incidents.
- Third-Party Accessories: Any damage caused by the use of third-party accessories or components not explicitly approved by Dispomed is not covered under this warranty
- Serial Number Alteration: If the serial number of the insPurr ventilator has been altered, defaced, or removed, the warranty becomes void.
- Consequential Damages: Dispomed Ltd. is not liable for any consequential damages, including but not limited to, loss of revenue, loss of use, or other financial losses resulting from the use of the insPurr ventilator.
- Product Misuse: The warranty does not cover damages or malfunctions caused by the intentional misuse or negligent operation of the insPurr ventilator.
These exclusions and limitations are in effect to ensure the fair and appropriate application of the warranty terms. If you have any questions or concerns regarding these exclusions and limitations, please contact Dispomed Ltd.’s Service and Information Center.
Claims Process
In the event that you need to initiate a warranty claim for your insPurr ventilator from Dispomed Ltd., please follow the outlined claims process:
Step 1
- Contact Dispomed’s Service and Information Center:
Reach out to Dispomed Ltd.’s Service and Information Center through one of the following channels:- Toll-Free
1-800-363-1746 - Phone
1 450 759-9395 - Email
info@dispomed.com
- Toll-Free
Step 2
- Provide Necessary Information.
Clearly state your name, contact details, veterinary clinic information and the serial number of the insPurr ventilator.
Describe the nature of the issue or defect you are experiencing.
Step 3
- Follow Guidance from Dispomed’s Support Team.
Dispomed’s support team will guide you through initial troubleshooting steps over the phone or via email to determine the nature of the issue.
Step 4
- Determination of Warranty Coverage.
If the issue is determined to be covered by the warranty, the support team will provide instructions on the next steps.
Step 5
- Return Authorization (if applicable)
If a return is necessary, Dispomed’s support team will issue a Return Merchandise Authorization (RMA) number and provide instructions on how to return the product.
Step 6
- Package the Product Securely
Ensure the insPurr ventilator is securely packaged for return shipment. Include the RMA number on the packaging.
Step 7
- Shipping Instructions
Follow the shipping instructions provided by Dispomed’s support team. Note that shipping charges for the return are the responsibility of the customer.
Step 8
- Loaner Unit (if applicable)
If available, Dispomed may offer a loaner unit to use during the repair period.
Step 9
- Evaluation and Repair or Replacement
Dispomed’s technicians will evaluate the insPurr ventilator and, at their discretion, either repair or replace the unit.
Step 10
- Return Shipment
Once the repair or replacement is completed, Dispomed will arrange for the return shipment of the insPurr ventilator.
Step 11
- Final Checks
Upon receiving the repaired or replaced unit, perform final checks to ensure the issue has been resolved.